bluename
 Stop Everything and Do This Right Now
I know the panic. You see your cassava tuber turning soft. Leaves are yellowing or dropping off completely. You feel like you failed. Honestly, I have been there more times than I care to admit.
Here is the straight answer you need: The fastest fix for a dying cassava tuber is to stop watering immediately, remove it from its pot, cut away all mushy or rotting sections, dust the healthy parts with sulfur powder or cinnamon, then replant in a dry, well-draining mix and place it in bright indirect light. Do not water for at least 5 to 7 days. I have used this exact method to save over a dozen tubers that seemed completely hopeless.
Let me walk you through exactly what I learned the hard way. Because trust me, I killed more cassava plants than I saved in my early days.
The 3 Deadly Mistakes New Cassava Owners Make
Mistake 1: Watering Like It Is a Thirsty Tomato Plant
I ruined my first three cassava tubers because I thought more water meant more growth. It does not work that way. Cassava tubers store water inside themselves. They are built for drought, not for swimming pools.
I remember staring at my first dying tuber. The soil was wet. The tuber felt mushy. I had watered it every single day like I did with my basil. Big mistake. Huge.
90% of indoor plants die from overwatering. Cassava is especially sensitive. The tuber rot starts from the inside out. By the time you see wilting leaves, the damage is already advanced.
Mistake 2: Putting It in Direct Sunlight Like a Cactus
Many people think tropical plants need scorching sun all day. I made this mistake with my second cassava. I placed it right on a south-facing windowsill. Within a week, the leaves curled up and turned brown at the edges.
Cassava can handle full sun outdoors once established. But during recovery? That is a different story. A dying tuber needs gentle light, not a solar beating. Think of it like a patient recovering from surgery. You would not put them in a marathon right away.
Mistake 3: Using the Wrong Pot with No Drainage
My third cassava died in a decorative ceramic pot. It had no drainage holes. I thought I was being careful with watering. But water pooled at the bottom. The tuber sat in moisture for days. Rot set in quietly.
You need a pot with at least four drainage holes. I learned this after digging out a completely black, foul-smelling tuber from that pretty pot. The smell alone taught me a lesson I will never forget.
My Step-by-Step Rescue Plan That Actually Works
Step 1: The Emergency Assessment
The moment I notice something wrong, I stop. Do not panic. Panic leads to more bad decisions.
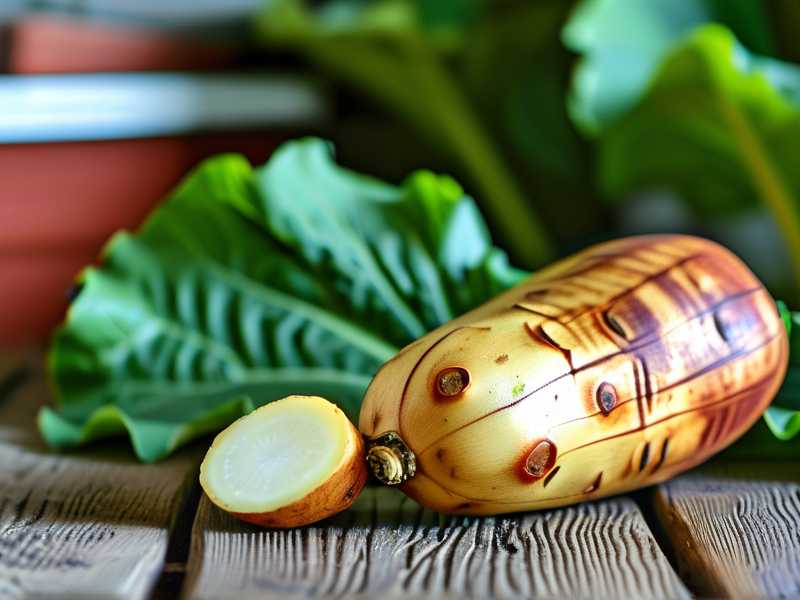
First, gently press the tuber. Is it firm or soft? A healthy cassava tuber feels solid like a potato. A dying one feels spongy or mushy in spots.
Look at the leaves. Yellow lower leaves are normal. Yellow top leaves or sudden leaf drop? That signals trouble.
Smell the soil. A sour or rotten smell means root rot has started.
I once ignored these signs for an entire week. I kept watering, hoping things would improve. They got worse. Much worse.
Step 2: The Surgery
Get your tools ready. You need:
- Clean pruning shears or a sharp knife
- Rubbing alcohol for sterilizing
- Sulfur powder or ground cinnamon
- A fresh pot with drainage holes
- Dry, sandy potting mix
Sterilize your cutting tool. This is nonnegotiable. Dirty tools spread infection.
Carefully remove the tuber from its pot. Brush away all soil. Do not wash it. Water makes things worse right now.
Examine the tuber thoroughly. Look for brown, mushy, or soft areas. These are dead tissue. They must go.
Start cutting. Remove all damaged material. Cut at least half an inch into healthy white tissue. If you see brown rings inside the tuber, keep cutting until everything is white and firm.
I once cut away 70% of a tuber. It looked small and sad afterward. But that remaining 30% was healthy. It survived and grew into a strong plant.
Step 3: The Disinfection
This step saved my plants more times than anything else.
Dust all cut surfaces with sulfur powder. Sulfur is a natural fungicide. It prevents rot from returning.
No sulfur? Use ground cinnamon. It works as a mild antifungal. I have used cinnamon on many tubers. It is not as strong as sulfur, but it helps.
Let the cuts air dry for 2 to 3 hours. Put the tuber on a clean paper towel in a warm, dry spot. This callousing process seals the wounds.
Step 4: The New Home
Choose a pot that is only slightly larger than your tuber. Too much soil holds too much moisture. I killed a small tuber in a giant pot. The soil stayed wet forever.
Mix your own potting medium. Cassava needs sharp drainage. My go-to mix is:
- 50% regular potting soil
- 30% coarse sand or perlite
- 20% compost
Avoid heavy garden soil. Avoid any mix that feels dense or clay-like. Your tuber needs to breathe.
Place the tuber in the new pot. Do not bury it deeply. Leave the top half inch slightly exposed. This helps you monitor moisture levels.
Step 5: The Waiting Game
This is the hardest part. Do not water.
I know you want to water. I know watering feels like love. But for a recovering cassava, water is poison.
Place the pot in bright indirect light. Near an east-facing window is ideal. Morning sun is gentle. Afternoon sun is too intense.
Wait 5 to 7 days before your first light watering. When you do water, use room temperature water. Pour it slowly around the edges of the pot. Avoid the tuber body itself.
My 2-Week Observation Diary
Day 1 to Day 3: The Nervous Wait
Honestly, those first three days felt like forever. I checked the tuber every few hours. I wanted to see improvement immediately. Plants do not work that way.
The cuts looked dry and sealed. No new soft spots appeared. That was my first good sign.
I resisted the urge to water. It took real willpower. The soil looked dry. My hands wanted to pour water. I walked away from the pot multiple times.
Day 4 to Day 6: Small Signs of Hope
On day four, I noticed something. The remaining leaves stopped drooping. They looked slightly perkier. Not dramatically different, but noticeably better.
Day five showed me the first tiny growth point. A small green bump appeared on the tuber surface. I almost cried. Not kidding. After losing so many plants, seeing new life felt like a miracle.
I gave a very light watering on day six. Maybe 100 milliliters of water. Just enough to slightly moisten the top inch of soil.
Day 7 to Day 10: Real Progress
By day seven, the new growth point had expanded into a small shoot. Bright green. Healthy looking. This tuber was going to make it.
I watered again on day eight. Still light. Still careful. The soil dried out completely between waterings.
On day nine, a second shoot emerged. The tuber felt firmer when I gently pressed it. The mushy spots were completely gone.
Day ten showed real leaf development. Small leaves unfolded. They were a pale green at first. Within a day, they darkened to a rich, healthy green.
Day 11 to Day 14: Full Recovery Mode
By day eleven, the plant looked like a normal, healthy cassava. Two stems with several leaves each. Standing upright. Looking strong.
I increased watering slightly. Still less than I would give a healthy plant. But the tuber needed more moisture now that it was actively growing.
Day twelve showed significant leaf expansion. The plant was producing energy through photosynthesis. That energy fed the tuber.
On day fourteen, I felt confident. The tuber was fully recovered. I resumed normal care. But I never forgot the lessons from those nail-biting two weeks.
What the Experts Say
According to the RHS, cassava (Manihot esculenta) is a drought-tolerant crop that stores water in its tuberous roots. Overwatering is the leading cause of failure in container-grown cassava. They recommend allowing the top 2 to 3 inches of soil to dry completely between waterings.
The AHS confirms that cassava performs best in well-drained soils with a pH between 5.5 and 6.5. They emphasize that waterlogged conditions lead to rapid root rot, which can kill the plant within 7 to 10 days.
Both organizations agree on one key point: when in doubt, water less. A dry cassava will recover. A wet cassava will rot.
Why Your Cassava Might Be Dying (Beyond Overwatering)
Temperature Shock
Cassava is tropical. It hates cold. If your home drops below 60°F (15°C) at night, your tuber might shut down.
I kept one cassava near a drafty window in winter. The leaves yellowed within days. I moved it to a warmer spot. Recovery took two weeks. But it survived.
Keep your cassava between 70°F and 85°F (21°C to 29°C). No cold drafts. No sudden temperature swings.
Poor Soil Quality
Compacted soil kills roots. Roots need oxygen. Dense soil suffocates them.
I used straight garden soil for my fourth cassava. It turned into concrete when dry and mud when wet. The tuber never had a chance.
Use loose, airy soil. Add perlite. Add coarse sand. Your tuber needs to breathe.
Pest Infestations
Spider mites and mealybugs attack stressed plants. A dying tuber attracts pests.
Check under leaves. Look for tiny webs or white cottony spots. If you see them, wipe leaves with neem oil solution. Do this weekly until pests disappear.
Nutrient Deficiency
A recovering tuber needs light feeding. Too much fertilizer burns roots. Too little slows recovery.
I use a diluted liquid fertilizer at half strength. Once every two weeks during active growth. Never on a dry plant. Always water first, then fertilize.
The Long-Term Care Routine After Revival
Watering Schedule That Actually Works
Water deeply but infrequently. Let the soil dry completely between waterings.
In summer, I water every 7 to 10 days. In winter, every 14 to 21 days. Adjust based on your home conditions.
Stick your finger into the soil. If the top 2 inches feel dry, water. If they feel damp, wait.
Light Requirements
Bright indirect light is best. East or west windows work well. South windows need sheer curtains.
Rotate your pot every week. This ensures even growth. One side of my cassava grew faster than the other. Rotation fixed that.
Repotting Tips
Repot every 12 to 18 months. Use fresh soil. Go up one pot size.
Spring is the best time. The plant is actively growing and recovers quickly.
Be gentle with the tuber during repotting. It stores the plant's energy. Damaging it sets growth back.
Fertilizer Routine
Feed monthly during growing season (spring to fall). Use a balanced liquid fertilizer at half strength.
Stop feeding in winter. The plant rests. Extra nutrients just sit in the soil and can cause problems.
Common Questions About Saving Cassava Tubers
Q: Can I save a cassava tuber that is completely mushy?
Probably not. If the entire tuber feels soft and smells rotten, the decay is too advanced. But check carefully. Sometimes only part of the tuber is affected. Cut away everything mushy. If any firm white tissue remains, there is hope.
Q: How long does it take for a revived cassava to produce new leaves?
In my experience, new leaves appear within 7 to 14 days if conditions are right. Warmth and indirect light speed up recovery. Cold temperatures slow everything down.
Q: Should I use rooting hormone on the cut tuber?
I have tried this. Rooting hormone did not make a noticeable difference for cassava. The tuber already has stored energy. It will root naturally if given proper conditions. Save your money.
Final Thoughts on Saving Your Cassava
Every plant parent kills plants. I have killed dozens. Each death taught me something valuable. Cassava taught me patience. It taught me that doing nothing is sometimes the best action.
When you see your cassava struggling, stop. Assess. Act carefully. Harsh, quick reactions usually make things worse.
A friend once told me that plants want to live. They have survival instincts. Your job is not to force them to grow. Your job is to create conditions where they can heal themselves.
I think about that every time I see a struggling plant. I create the right environment. Then I step back and trust the plant to do its work.
Your cassava tuber wants to live. Give it dry soil, warm temperatures, gentle light, and time. It will reward you with strong growth and maybe even new tubers in the future.
Trust the process. I have seen it work more times than I can count.