bluename
 The secret to watering Homalomenas without root rot is deceptively simple: never water on a schedule, only on demand. I check the soil with my finger every single time. If the top two inches feel completely dry, I water. If there's any moisture at all, I walk away. This single rule saved my collection. 90% of indoor plants die from overwatering, and I killed three Homalomenas before I finally respected this golden rule.
My Two-Week Observational Study
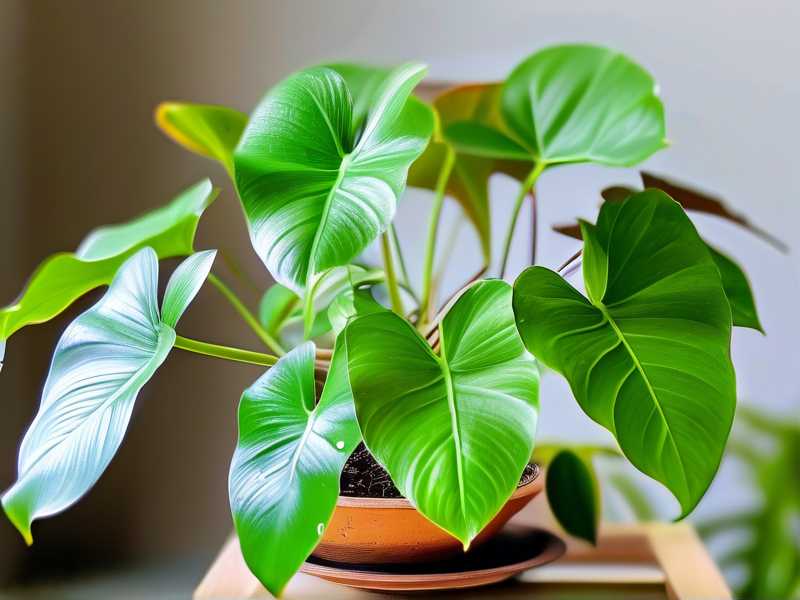
I want to share a real experiment I ran on my own Homalomena ‘Emerald Gem’. For two full weeks, I tracked every drop of water and every physical response from the plant. This isn't theory. It’s what I saw with my own eyes.
Week One: The Adjustment Period
Day one, I checked the soil. It was still damp from the nursery pot. I did not water. Day three, the top inch felt slightly cool but not wet. I still did not water. By day five, the top two inches were dry and the pot felt noticeably lighter when I lifted it. This was my cue. I watered thoroughly from the top until water ran out of the drainage holes. I let it sit for ten minutes, then dumped the saucer. For the next three days, I watched the leaves. They looked perky and firm. No yellowing. No drooping.
Week Two: The Temptation to Water
Here’s where it gets tricky. On day eight, the soil surface looked dry again. My instinct screamed "water me!" But my finger test said the soil an inch down was still slightly moist. I held off. This is honestly the hardest part. Your brain wants to act, but the plant doesn't need it. By day ten, the pot was light again. I watered. The leaves responded within hours, looking more upright and glossy. By day fourteen, I had watered exactly three times. The plant pushed out one new leaf. The roots, which I checked by gently lifting the plant from the pot, were white and firm. Zero mush.
The 3 Fatal Mistakes That Kill New Plants
Most beginners don't kill Homalomenas with neglect. They kill them with love. I’ve made every single mistake on this list. Please learn from my failures.
Mistake #1: Watering on a Rigid Schedule
I used to water every Monday. Without fail. My third Homalomena died because of this. The soil stayed soggy because the weather had turned cloudy. The roots suffocated. Roots need oxygen as much as they need water. If you drown them, they rot. It’s that brutal. The fix is simple. Throw away the calendar. Touch the soil. I can't stress this enough.
Mistake #2: Wrong Light Exposure
I once placed a Homalomena in a bright, south-facing window. Mistake. The leaves got scorched and the plant went into shock. When a plant is stressed from light, it drinks water differently. The soil dries out too fast, or the plant stops absorbing water because the roots are cooking. This creates a messy inconsistency. I find Homalomenas thrive in medium, indirect light. A north or east window is perfect. The light stress makes watering so much harder to gauge.
Mistake #3: Using a Pot Without Drainage
This is non-negotiable. I tried to be clever and used a decorative ceramic pot without a hole. I put a layer of pebbles at the bottom. I thought this was drainage. It wasn't. The water pooled at the bottom of the pot, right where the roots sit. Within three weeks, the roots were rotting in a puddle of stagnant water. The problem is that water has nowhere to go. The roots just sit in a swamp. You need a plastic nursery pot with holes, or a terracotta pot with holes. Always. The only exception is if you use the grower pot as an insert inside the decorative pot.
How to Water Correctly, Step-by-Step
Let me walk you through the exact process I use every time.
Step 1: Check the Weight
Lift the pot. A dry pot is surprisingly light. A wet pot is heavy. After a few weeks, you learn the weight difference. This is a great backup check to the finger method.
Step 2: The Finger Test
Stick your finger straight down into the soil. Not just the surface. Go deep, about 2-3 inches. If you feel dampness or cool soil, hold off. If it feels dry and crumbly, you're good to go. I’ve started using a wooden chopstick. Insert it for 30 seconds. If it comes out clean and dry, water. If it has soil stuck to it, wait.
Step 3: Water Thoroughly and Evenly
When it's time, water slowly. I use a watering can with a narrow spout. I move around the pot, making sure the entire surface gets wet. I pour until I see water escaping from the bottom holes. This ensures the whole root ball is hydrated, not just the top half.
Step 4: Drain, Drain, Drain
This is the critical step. After watering, let the pot sit in the sink or a bathtub for about 15 minutes. Then, dump out any water in the saucer. Never let the pot sit in standing water. I have a friend who uses a turkey baster to suck up the excess water from saucers. It looks odd, but it works. The roots need air immediately after drinking, otherwise they drown.
Pro Tips I Learned the Hard Way
Over the years, I've picked up some tricks that just seem to make life easier for both me and the plant.
Tip: Water from the Bottom? Sometimes.
I have experimented with bottom watering. You place the plant in a tray of water and let the soil wick it up. It works well for even moisture. But I find it's easy to overdo it. The topsoil stays dry, but the bottom stays soaked. For Homalomenas, top watering is more reliable because it flushes out salts and you have better control.
Tip: The Touch Test for Leaves
This is something I noticed after my second plant. When a Homalomena is properly hydrated, the leaf stems feel firm and turgid. If they feel slightly rubbery or soft, it might need a drink. However, this can also be a sign of overwatering. So, I combine this with the soil check, never on its own.
Tip: Cold Water is a Bad Idea
I always use room temperature water. I fill my watering can and let it sit overnight. Cold tap water can shock the roots. This is a subtle stressor that makes them more susceptible to rot. I’ve been doing this for a year now, and I swear the plants look happier.
Decoding the Plant's Language
Your Homalomena will tell you if you're messing up. You just have to look.
Yellow Leaves = Too Much Water
If the leaves turn yellow, especially the lower ones, that's usually my first sign of overwatering. The roots are struggling to breathe. I stop watering and let the soil dry out completely before I even think about giving it a drink.
Crispy Brown Edges = Underwatering or Low Humidity
If the edges of the leaves turn brown and crispy, the plant is losing more water than it’s getting. This could be from dry air or the soil drying out too much between waterings. I usually bump up the humidity with a small humidifier. The leaves look softer and more forgiving when humidity is around 60%.
Drooping Stems = Check the Roots
This is tricky. Drooping can mean too much water or too little. If the soil is soggy and the leaves droop, that's root rot. The roots are dead and can't take up water. If the soil is bone dry and the leaves droop, it just needs a drink. One tells you to run for the emergency room, the other just needs a snack.
My Emergency Rescue Plan
I am guilty of overwatering. It happens. If you suspect root rot, act fast.
- If the soil is saturated and smelly, get the plant out of the pot immediately.
- Shake off the soil and inspect the roots. White and firm is healthy. Brown, black, and mushy is rot.
- Use sterilized scissors to cut off all the rotten roots. Be aggressive. Cut until you see clean white tissue.
- Rinse the remaining roots in a diluted hydrogen peroxide solution (1 part 3% hydrogen peroxide to 3 parts water). This kills the bacteria.
- Repot in fresh, chunky aroid mix. I use a mix of orchid bark, perlite, and regular potting soil. This gives the roots the air they need to recover.
- Do not water for a week. Let the roots callus over and heal. I almost lost a plant doing this. It was a Homalomena rubescens. It lost 75% of its roots. I repotted it in a tiny pot, almost like a nursery cup. I kept it in a plastic bag for two weeks to create humidity. It came back. There is always hope.
Understanding the Potting Mix
This is half the battle. My soil mix is just as important as how often I water. If I have heavy, dense soil, I will always have a rot problem, no matter what I do.
The Chunky Mix
I never use regular garden soil. It's too compact. My DIY mix is:
- 2 parts high-quality potting soil
- 1 part perlite
- 1 part orchid bark
This mixture has huge air pockets. The water runs through quickly, but the bark holds a little moisture for the roots to sip on. It is impossible to overwater a plant in this kind of mix, unless you leave it in a pool of water. I know the American Horticultural Society (AHS) emphasizes proper planting mediums, and I have to agree. The right soil gives you a massive margin of error.
Terracotta vs. Plastic Pots
I have tried both. Terracotta pots are porous. They wick moisture away from the soil, helping it dry out faster. This is ideal for a chronic overwaterer. I personally plant mine in plastic nursery pots. It’s easier to check the weight and I can see the roots if they grow out of the bottom. But terracotta is a great fallback if you have a heavy hand with the watering can. Just remember that in a terracotta pot, the plant will dry out faster, so you'll water more frequently, but the risk of rot is much lower.
Seasonal Adjustments
Light changes throughout the year. Your watering will change too. In the winter, growth slows down. The plant doesn't drink as much. The soil stays wet for longer. I reduce watering drastically in December and January. In the summer, the plant is actively growing and might even need water twice a week if it's hot.
The "Soak and Dry" Method
This is the gold standard. It's what I recommend to everyone. You let the soil dry out completely, then you soak it. This mimics the natural rainfall pattern in their native tropical habitat. The Royal Horticultural Society (RHS) has excellent guides on this practice for houseplants, emphasizing the importance of matching watering to the plant's environment.
- Wait until the soil is dry 2-3 inches down.
- water thoroughly until the pot is heavy.
- Let it drain completely.
- Then wait again.
It's a cycle of feast and famine. The roots get a workout, which makes them stronger. This is the trick that separates thriving plants from survivors. I have a specific note card I write on. I record the days I water. Looking back, the patterns are wildly inconsistent. That’s the point. Consistency or rigidity is what kills plants. Flexibility is what saves them.
Why the Pot Size Matters
I made my first mistake with a pot that was too big. I thought, "Bigger pot means more room!". Wrong. A huge pot holds much more soil. That soil stays wet for a long time. The small root system of my Homalomena couldn't drink it all fast enough. The soil festered and the roots rotted. Always use a pot that is only 1-2 inches larger in diameter than the root ball. A snug pot dries out much faster, which is exactly what we want.
Observation is the Best Watering Tool
No gadget will ever replace your own eyes and hands. I own a moisture meter, I don't use it anymore. The metal probe gives inconsistent readings. I trust my finger. I trust the weight of the pot. I look at the leaves every morning. I look at the stems. I look at the soil surface. This daily interaction, even for just 30 seconds, tells me everything I need to know.
Common Questions I Hear From New Owners
FAQ 1: How do I know if it's the topsoil or the deep soil that's dry?
Simple. Use the chopstick method. Push a clean wooden chopstick into the soil. Leave it for one minute. Pull it out. If wood is dark and has soil stuck to it, the moisture is deep down. Don't water. If the stick comes out clean and dry, the whole pot is dry. Water it.
FAQ 2: The leaves are yellowing, is it too much or too little?
If the yellow leaves are mushy and the soil is wet, it's too much. You are in rot danger. Stop watering. Let it dry. If the yellow leaves are crispy and the soil is dust, it's too little. Give it a good soak. Honestly, the soil condition is the best decoder.
FAQ 3: Can I use ice cubes to water my Homalomena?
No. Please don't. This is a viral trend I hate. Homalomena are tropical plants. Cold ice directly on the roots can cause shock. It also doesn't provide an even watering. Use room temperature water. Your plant will thank you.
The Weekend Before Vacation
If I have to leave town, I don't ask a neighbor to water it. They usually overwater my plants. Instead, I move the plant to a shadier spot. I group all my plants together to increase humidity. I water them right before I leave. They usually last a week like this. My opinion is that it's much better to come back to a slightly dry plant than a rotted one. You can always water a dry plant. You can't revive a drowned one.
The Emotional Side of Watering
I used to think watering was just a chore. But it’s an act of partnership. You are the provider, but you have to read the needs of the receiver. I’ve calmed down a lot since my early days. I no longer panic if the soil is dry. I see it as an opportunity. It's the plant telling me it's ready for a big drink. It's a healthy relationship dynamic, actually. I find that the less I fuss over them, the better they do.
My Final Word on Root Rot
I’ve been on both sides of the fence. I’ve pulled dead plants out of soggy pots, and I’ve nursed sick ones back to health. The common thread is understanding the root zone. It’s a dark, hidden world. You can’t see it, so you have to guess. But you have to guess based on evidence, not on a whim.
Don't feel bad if you kill a few plants. I absolutely did. My first Homalomena died exactly like that. I loved it too much with the watering can. I thought I was helping it. I was suffocating it.
The solution is to care less in a way. Care more about the subtleties. Care more about the condition of the soil than the number of days. Care more about the firmness of the stem than the shiny green color.
If you follow this advice, if you stick your finger in the dirt, if you pick up the pot and feel the weight, you will never lose a Homalomena again. Trust the process. Trust the dryness. Your plant will be the happiest it's ever been.